Showing posts with label Construction Materials. Show all posts

Friday, 3 April 2015

Back to the Boat

It’s that anxious time of year – spring may be just around the corner but I recall two years ago when,after a mild winter, we had snow through March to April. The boat has been somewhat neglected recently. It seems as if all the effort to bring her back to life before the end of the summer left me quite exhausted. There again maybe it wasn’t exhaustion. Maybe it had something to do with the need to make progress in other areas of life – get some things off the list. (See my other blog ‘Frugal Living in France)


So, the boat was launched looking good on the outside but the interior was more like a floating slum. The cabin remains to be renovated and it has to be done because this year we’re going to make a real voyage – somewhere.

There is good news though – the paint systems and the wood treatments I used have stood up to the winter really well so I can wholeheartedly recommend International Paint Products – especially ‘WoodSkin’.

And here is another product I can recommend – it has a million and one uses on a boat and I’m now a firm believer that every boat should carry it. What is it? Well, it’s a product called ‘Sugru’ – a sort of self-setting rubber, disguised as a kind of play-dough.

It comes in handy sized sachets in a variety of colours. Open the packet and make whatever shape you want with your hands or by pressing it into a mold – it is very pliable. Twenty four hours later it will have set to a tough, flexible silicone rubber. Before it sets it
is self adhesive – it will stick to aluminium, steel, ceramics, wood, glass or most plastics. When it is set, it can be removed from non-porous surfaces. When cured it is waterproof and even dishwasher proof. It doesn’t mind heat or cold, it is electrically insulating and UV resistant, and if aesthetics are important, it comes in a variety of colours in each pack so you can mix the colours to create the colour and shade you require.

To date, I have used it to plug an above-water engine outlet that was no longer required. I have used it to make washers for nuts and bolts and I have created grommets to protect electric cable when passing through bulkheads. I have also made pads behind equipment attached to bulkheads to eradicate vibration noise. I have used it to cover bolts where they come into the cabin – at least I’ll bang my head more softly now. Rings made of Sugru also stop my wine bottles rattling, and similar rings around my thermos flask improve its chances of survival if it falls off the bench. In an emergency it would make an idea temporary bung but best of all it can be used to protect expensive objects with sharp corners – iPads, cameras etc.

I'm sure there are lots of other uses for the stuff and I’m also sure that there is probably a different solution for each use of Sugru that I have mentioned here – the point I am making though, is that Sugru is one item with a million uses so I don’t have to think up new solutions. Take some to the boat whenever you visit but keep the rest in the fridge at home. The fridge extends its use-by date significantly.


UK Readers can get it here
Sugru Multi-Colour (Pack of 8)

USA Readers can get it here
Sugru SMLT8 Hardware Sealer, Multi Color, 8-Pack

Seaward


Sunday, 11 May 2014

Boat Polishing

Cleaning sanding sealing and polishing are the processes involved in restoring an old GRP boat. Having spent the best part of a year doing this I now feel qualified and experienced enough to pass on a few hints and tips.

Firstly, there is no substitute for cleaning and washing. This is one of the most important tasks in the whole process. Dirty boats are covered in sand and grit if you don’t wash this film of dust off, it acts like a very coarse sandpaper and puts scratches and gouges into the gel coat – making the polishing task so much harder.

When the boat is clean you have to wash down with a product that will lift off any silicon which may have impregnated the gel coat through previous use of inappropriate polishes. There are several products that will do this, the cheapest I discovered was Acetone (bought in a DIY store rather than a chandlers).

There is a good deal of confusion about polishing products and processes. The best way I found to describe
the process was to think about a friend whose hobby was to find and polish stones. Basically he had a machine comprising a small metal drum turned by a tiny electric motor. The pebble was put in the machine along with a handful of coarse sand and the pebble was tumbled in the sand for days and days. Later the coarse sand was removed and finer grade sand was added in order to remove the scratches that the coarser grade material had made on the pebble. Each few days saw the removal of sand and the addition of finer and finer abrasive material. All the materials were abrasive but each one was less abrasive than the previous. Gradually the pebble ceased to look scratched and actually began to gleam. So it is with gel coat and the trick is to begin with the least abrasive, finest sandpaper you can get away with. The essential message is that although you are ‘sanding’, you are also polishing from day one.

I began to notice the ‘gleam’ in the gel coat when I got down to 1000 grade sandpaper and then the shine improved through 1500, 2000 to 3000 grade.

When you’re happy with the result you need to ‘seal’ the surface. This is where confusion can easily arise because different product manufacturers use a variety of terms – often their ‘sealers’ are described as ‘polishes’ and sometimes their polishes are not sealers. A good sealer contains materials that are absorbed by the Gel Coat, a polish simply sits on top and gleams. The sealer I used is a Starbrite product and I can really recommend it. The active ingredient is PTEF (don’t ask me for more technical information). The recommended process is to rub the sealer onto the Gel Coat and leave it to dry. After about 24 hours you can remove the residue with a soft clean cloth and then repeat the process a second time. On the second cleaning you should notice a deep lustre appearing under your cloth and the Gel Coat begins to feel less like plastic and more like porcelain. I inadvertently began to sand a small part that I had previously sealed and the difference was immediately noticeable. The sealed area was much harder – it felt and sounded different somehow under the sanding paper.

The final stage is to polish with a liquid marine polish and the shine should be outstanding. This final coat is cosmetic and temporary; the weather will degrade it over the season so you have to polish regularly to keep the glassy appearance. Even a dirty boat can take on a temporary glassy gleam if you polish it but for long lasting protection nothing beats a sealer on a clean surface. As I said I use Starbrite’s Premium Boat Polish with PTEF and was very impressed. I have no connection with the company by the way – simply passing on my experience and giving credit where it is due!

USA readers can obtain Starbrite Premium Boat Polish with PTEF here
Star brite Premium Marine Polish Boat Wax with PTEF, 16 oz

UK readers can obtain it here
Starbrite Premium Marine Polish with PTEF14 oz.(paste)


Seaward

Saturday, 29 March 2014

Cockpit Well for a Westerly

original well, ugly but functional - or so I thought
I’m hoping to get a fresh start on the boat next week. In recent weeks I have had to abandon planned and sequenced work in favour of a more opportunist approach, doing what I can, when I can, working round the professionals I engaged to remodel the cockpit and engine well. For new readers I should explain that, I bought this boat as a ‘modified’ Westerly Nomad. These boats came with inboard and outboard options. This one however, had been modified at some point to create an outboard well in the cockpit. At the time, I was quite enthusiastic about the modification because it seemed to offer me the best of all worlds, an outboard which could perform like an inboard. I don’t like to see outboards strapped on the stern of boats, I find them ugly. What is more, I have had cavitation problems with almost every strapped on outboard I have encountered. They simply don’t bite deep enough and as a result, in anything of a sea, the prop is spinning in air as much as water. The other advantage, is that it is much easier and cheaper to maintain an outboard than an inboard. You can take it to engineers rather than having them come to you and out of season you can store it at home.

great hole in the boat - frightening!
Well, that was my thinking and I still stand by it but unfortunately, having bought the boat, it soon became clear that the well had been badly constructed – in fact it was downright dangerous. It first came to my attention that all was not well when I discovered two sea cocks, presumably water intakes and outtakes for an earlier inboard engine. These seacocks were still attached to rubber hoses that seemed to go nowhere. An engineer soon discovered that their purpose had been modified and now they were supposed to serve as cockpit drains, but the cockpit had been cut in half by the new outboard well. We then discovered that to drain water past the well, holes had been cut into the plywood walls. The bare plywood was now delaminating and the strength of the box was degraded. On further examination we discovered that the GRP sheathing on the plywood was megre and poorly attached in places. In fact it was so bad that under the boat large patches of it could be broken off simply by getting your finger nails under it. The guy who modified the boat had simply tried to stick GRP mat over old antifouling.

finished well - waiting for final gel coat
I read all I could about GRP and was about to attempt a rebuild myself when my old boss got in touch and asked me to undertake a twenty day project for him. It was a tempting offer, the money would pay for a new bathroom in the house, it would be a significant contribution to the renovation of my barn, and there would be plenty left over for a weekend in Paris with Susan. The downside of course, was that it would take me away from the boat. So I called in the professionals to undertake the work on the boat and used a little of the money to pay for it.

The work involved a lot of grinding cutting and glassing in so even though my Jersey project is now completed, I have had to work around the professionals to make sure I’m not making dust when they require a dust free environment. Despite these problems however, I have to admit that the work these guys have done is absolutely outstanding. They have turned a practical but ugly modification into something that looks as if it had been part of the original design, building a beautiful sloping half deck around the well and creating a cockpit that drains water into the well invisibly.

There is an interesting relationship between time, money and skill which fascinates me and I’m still exploring it. In this case if I had done the boatwork myself, there would have been no labour costs but it would have taken at least three times as long and the result would not have been so aesthetically pleasing. The route I took was to undertake a different (non boat) project that took less time and earned significantly more than needed for the boat, and then I used some of that income to finance the boat modification. The outcome was a better job done on the boat and less effort for me. All things should be done in moderation however, I mean, I wouldn’t want to use this argument as a reason for going back to working full-time for the man – oh no I’m far too busy for that – or at least I will be when I get this boat on the water!


Seaward

Friday, 14 March 2014

New Hatch for a Westerly Nomad

So here are the refurbished hatches for my boat – almost finished – just needing a little sanding and then a
coating – oil or varnish? For me its going to be International Paints ‘Woodcoat’, I’ve used it already on the rubbing streak and it seems to be a good product – I noticed also that Classic Boat magazine tested it and gave it three stars – that’s to say it was still good 54 months after application. The manufacture suggests three coats but I’ll probably do five.

I kept a list of materials used and costs just to kill the myth that you can purchase an old boat and renovate her at little expense – you can’t. Marine quality materials are expensive. Even if you are a DIY expert you shouldn’t get into this unless you have the resources, and remember these aren’t new hatches, I already had the frames and all the metal fittings.


To renew these hatches cost:

Marine ply 6mm –                                30 Euros
Teak (like) lats of wood (machined)      50 Euros
Glue                                                     16 Euros
Rubber compound                                32 Euros
Fillers and sanding papers                     8   Euros

TOTAL                                               130 Euros

In addition there will be:

Pre-Kote (International Paints) undercoat
Toplac (International Paints) Mediterranean white top coat
Wood Coat (International Paints) Wood oil

Well when I launch I may not have the best boat in the harbour – but I’ll have the best
Hatches!


Seaward

Thursday, 20 February 2014

A New Hatch for a Westerly Nomad

Have been working in the warm whenever possible recently –outside is gale lashed and very wet – better
than the UK however, most of that seems to be under water. So, at last attention has been turned to the boat hatches. The main hatch into the cabin was made of Iroko and marine ply. The Iroko frame is in reasonable condition but the marine ply cover is delaminated and soft in places. I turned to a good friend Alain Hughes a boat-builder, engineer and an outstanding seaman. His solution was to strip away the ply and replace it with two sheets of 6mm ply glued and screwed together. Why two sheets? Because the curve was too pronounced to bend a single 12mm sheet. Around the frame Even with 6mm he had to use a router to create a few grooves on the underside to enable the wood to flex enough.

For purely aesthetic reasons he then added strips of a teak look-alike wood so that from the outside at least she looks planked. The fore-hatch is an ugly old GRP box and so Alain is going to use the left-over wood strips to produce a planked effect on that too. The wooden hatch is a really solid job and if the boat ever gets holed I know which bit of the boat I’ll be clinging on to.

While this has been going on I have started to paint wood taken from the inside of the cabin. The half bulkheads either side of the companion way. They had been varnished but I decided to use paint

because I want to create a sense of space within the cabin. Ideally, a mat white finish with strips of light varnished wood around the edges. I could have used the standard one pot international marine yacht paint but I didn't want a high gloss finish and anyway it was expensive. So I read that for cabin interiors a bathroom paint or an exterior paint is quite acceptable, because both can cope with humidity and contain anti-fungal additives. I opted for a Dulux exterior white ‘One Coat’ but it hasn’t worked I sanded off all the old varnish but so far I have applied four coats of the ‘one coat’ and it still hasn’t produced a solid even coat, and what’s worse it looks like plastic. Back to the drawing board with this I think.

 
Actually, having seen the fantastic effect of strip wood on the hatch, I’m seriously tempted to do something similar here – using some light oak panels. It adds weight but when you’re working on a Westerly Nomad (built like a tank, sails like a tank) – who cares!


Seaward

Monday, 10 February 2014

Small Acts of Kindness

So, there is a poster that I recall seeing somewhere ‘A Stranger is just a Friend you don’t know – yet’. Don’t know about you but I try to avoid these vapid homilies like the plague. Call me an old cynic (and you probably will), but I’m too long in the tooth for all that stuff.

But then, just once in a while something magical happens and you’re driven to believe that maybe there really is hope for us all. Last week I posted piece about two dilemma’s, the first was the difficulty I was having in sourcing teak, the second was the need to find a replacement antenna for a hand-held Navicom R210 VHF set.

Within a day or so a reader (and fellow blogger I think) called Alfonso, emailed with solutions to both issues.

1.      he used teak flooring from a French DIY chain called ‘Merlin’ to make steps for his bathing ladder (and a pretty good job he made of it judging by his photos (in a format I can't seem to copy)

2.      Generally speaking marine handheld VHF antennas are interchangeable providing the couplings are the same. Basically, if you can screw it on – it will work

Now for me this represented a great step forward, particularly because I had spent a great deal of time emailing marine parts distributors in the hope they had a Navicom antenna or one that would be compatible. Every answer was the same

 ‘No we don’t stock Navicom’
‘Yes but do you have any that match?’
‘No we don’t stock Navicom’.

I guess no-one wanted to take a chance on sending me a product from a different manufacturer if case it didn’t work.

So, armed with Alfonso’s advice I took myself to an Electrical supplies store near St Malo and plonked the handheld VHF on the counter

            ‘Do you have an antenna I can screw into this?’
            ‘Probably, I’ll have a look round’

Things were looking up; the storekeeper disappeared into his back room and returned after several minutes

            ‘Try this’, he said. I screwed in the antenna, pressed the ‘on’ button and immediately heard ST Malo Port Authority advising an incoming vessel to stand off until an outgoing vessel cleared the entrance - job done, but now for the best bit –

            ‘How much do I owe you?’
‘Nothing, it’s one I salvaged from a busted VHF someone brought in a while ago.’

So, Thanks Alfonso and the guys at the marine electronic distributors in St Jouan des Guerets. Now I’m a believer! Little acts of kindness can change the world (well my world at least!)

You can see other excellent Aflonso pics here Alfonso's Pics

Seaward


Sunday, 1 December 2013

Classic Boats

Take a look at this beautiful classic sailing boat that turned up in my home port last week. I love her
traditional long deep keel, beautiful overhangs and wooden top- sides. She probably quite fast, an excellent take-you-anywhere sea boat – a cruiser for serious cruising, and she seems to be in remarkably good condition. Apparently a lot has been spent on her. Just look at that gleaming hull.

Now, you can’t do this, but what if you took a much closer look? What if, like me you could put your nose right up against her and look along the length of the hull? Then you would see countless hairline cracks in the gel-coat, visible only along the hull. Look straight at it and you won’t spot a thing. Truth is, there is something awfully and expensively wrong – the gel coat is crazed like a piece of Raku pottery and the only cure seems to be to take it all off and re-coat.

So here she is today partially stripped. Stripping is the easy bit – re-coating fairing and painting is going to take time and expertise. Good luck to her owner and his bank balance.

And, for those of you busy sanding and renovating a GRP hull, well here’s what she will look like if you sand too far. Interestingly, the gel-coat on this boat seems to be remarkably thin. The older boats like the one I’m working on have much greater depth.


Meanwhile here is another boat that turned up at about the same time. She’s a Westerly 22, a slightly older cousin of the vessel I am currently trying to renovate. She’s a funny looking old tub designed by Commander  Rayner  who went on to set up the Westerly Boat Company which produced one of the most popular sailing yachts of all time – the Westerly Centaur, there are plenty of these here.

As for this Westerly 22, believe it or not, examples of this diminutive sloop have crossed the Atlantic. Some say that with her turned-up nose she looked like a banana. Rayner preferred to describe them as ‘Whalebacks’. They were built like tanks and some say they sail like tanks also.

I hope she’ll stick around. As these boats age there are less of them to be found in the UK and they certainly are a rarity in France. It would be good to think that when I launch next year, my Nomad will be part of a larger fleet of classic Westerlies.

PS: If you want to read more about my neck of the woods and life here please visit: Frugal Living in France


Seaward 

Monday, 25 November 2013

Boat Hatches

Sometimes it’s good to take a break from sanding, polishing and cleaning. Sometimes it’s good just to stand back and reflect on what you are doing, look at progress so far and improvements you have made. If you have an ice cold Belgian beer in your hand, you can actually become inspired!

It happened to me a couple of weeks ago and I’m still excited by it even though further thought and research
now leads me to believe that it wasn’t my idea at all. Rather it was the blossoming of the seed of an idea I discovered in a book several years ago (more of that later).

Anyhow, to you it may seem a small thing – but to me – not the most creative of people - it was like a shining light hovering above the road to Damascus.


There I was standing back looking at my work to date and wondering what to do about the wooden cabin hatch – truth is, it has rot, it has delaminated and it needs repair or replacement. I had already decided to replace it but not until spring. Use the old one to see me through winter. I had also decided that the new hatch should look planked (even if the planks merely hide plywood beneath).

That afternoon though, my eye was caught not by the rotting main hatch but by the equally ugly plastic box that pretends to be a fore hatch. I love this boat I am renovating but I am constantly aware that she was designed by Rayner – a naval officer who put functionality way in front of aesthetics. So the fore hatch works, it does its job – but why didn’t Rayner build it in the same style and material as the main hatch? Probably because the idea never entered his head.

Now, am I restoring this old boat, in which case things would be put back as the designer originally intended,
or am I doing something else - up-grading her maybe?  In which case I am free to make changes and, in this case, I think the change will be an improvement.

So, if replacing or covering plastic hatches with planked wood wasn’t an original idea of mine, where did it come from? Well there is a very good book that I bought several years ago which has proved to be a constant source of ideas and inspiration. It’s called ‘Smart DIY Boat Ideas by a guy called
Bruce Bingham. It’s full of suggestions and fully illustrated with pen and ink drawings. For me, the value of the book is the ideas he has for internal change. It’s relatively easy to stroll around a boatyard or marina and come away with several good ideas for the outside of a boat – but its harder to get views inside – so this is where his book scores. As well as ideas for covering significant areas of GRP with wood, he also explains a very effective method for obtaining measurements within boat cabins where every line seems to be a curve. I tried his method on a previous boat in it worked like a dream.

So, a sunny afternoon, a bottle of beer, and I have now doubled the amount of hatch-work I have to do! I know she’ll look so much better. Will she be faster or safer as a result of the additional effort?  No, but she’ll look prettier to me and she’ll be more ‘personalised’. Can’t imagine anyone else will notice – but I’ll know I have done right by the old girl.

You can get Bruce Bingham’s book here:
SMART D.I.Y. BOAT IDEAS (USA Readers)

Smart D.I.Y. Boat Ideas (UK Readers)

Finally, a number of people have requested more information on my other activities mainly about downsizing, living frugally and setting up a homestead in France - This blog isn't about that and I don't want to dilute its contents, so here is another site which deals with all that stuff:

Frugal Living in France


Seaward


Monday, 4 November 2013

Cracks and Blisters on GRP Boats

GRP gel-coat can be brittle and it gets more brittle with age. It also gains a ‘patina’ over the years and unlike
antique furniture, most of us boatowners don’t appreciate it. We like white – pristine white (on the white bits at least) hence the need to sand, compound and generally cut back to a layer of gel that hasn’t been exposed to the elements. It’s a pain to do but the rewards are obvious. There is a useful bi-product of all this effort too! When you’ve finished you can truly say that you know this boat, inch for inch better than anyone – better even that the builder who pulled her from the mold all those years ago.

Now, I started this project by saying that I didn't mind if the result of my efforts was less than pristine new show-room condition. She’s a old boat after all and I can live with the notion that she will show signs of her age here and there so long as she looks ‘cared for’ and seaworthy. The  problems is that the sanding and polishing process brings you within thirty inches of the hull and you soon develop an eye for those little blemishes that could be sorted with just another twenty minutes elbow grease.

There are some imperfections that have to be dealt with however. I’m talking here about cracks. Scratches I
can live with, providing I can understand how they happened and be sure that they aren't likely to compromise the integrity of the gel-coat – cracks however are another matter.

How do I define the difference? Well, for me, scratches are what you get on gel coat when, for example, people climb aboard and bring a few grains of sand with them on their shoes. They climb from the cockpit onto the deck in a certain way and over the years the gel coat takes a bit of a hammering. I sand back as far as I can and live with what I can’t eradicate. The scratches are old and reflect the life this old tub has enjoyed.

Cracks however, are deeper; they go through the gel coat and might be large enough to allow water ingress. They have to be sorted and the solution is a bit frightening because in order to fill the cracks with GRP putty you have to widen them with a chisel. In effect, initially at lease the ‘cure’ can look worse than the problem. Once the crack is widened and V shaped you have a chance of squeezing in the putty. Problem is it shrinks as it cures therefore you always have to apply it so that it is slightly proud of its surroundings and then when cured you have to sand it back – all the time hoping that you have a half decent colour match. You have to be careful in mixing the putty with the hardener also. The mixing has to be thorough; otherwise you can get an uneven set and, with a proportion of putty to hardener sometimes as little as 100 to 1,  it is very easy to add too much hardener – then the putty overheats and hardens off too quickly.

Crazing is a different matter. Some boats have it so bad they look like broken eggs! Personally, I’d stay away from them and seek another boat to work on. In localised areas however, the trick is to attack the problem while it is ‘cosmetic’, before it can begin to affect the integrity of the vessel.  The best advice on a repair seems to be to sand the surface heavily and roll on two coats of epoxy primer followed by two coats of two-part linear polyurethane. The epoxy fills and seals the cracks, and the polyurethane restores the colour and gloss. A paint free solution would be to grind away most of the crazed gelcoat and replace it with a fresh application of colour-matching gel coat paste.
Before you attempt any repair on cracked or crazed gel-coat however, you have to understand the root cause of the problem and fix it. No amount of filling, sanding, painting and polishing will provide a sustainable solution if the underlying cause has not been dealt with. Look at each problem area carefully with new eyes and try to work out what has happened and why.
Localized crazing is almost always due to flexing of the underlying laminate. So before  pasting over the cracks, you must stiffen the affected area before you can successfully repair the crazing.  Star shaped cracks around a fitting often suggest that the fitting itself has put too much strain on the fibreglass in that location. The strain may have been caused by a fastening being over tightened thus crushing the fibreglass core and cracking the gelcoat around the object. Alternatively, the star shaped crack may have been caused by too much pressure being put on the fitting itself, in which case you may need to fit a larger backing pad to distribute the strain over a larger area.
Star crazed cracks in elsewhere – the side of the hull or the fore-deck for example may have been caused by impact, a hard knock against a pontoon or lock wall, maybe someone dropping the anchor on deck. These are less worrisome as hopefully the cause was a one-off event not to be repeated.
Finally you may find little dings, blisters or holes in the gel coat here and there. Nine times out of ten they are a manufacturing fault. A void or small space in the core which was originally gel-coated over. There is little strength in gel coat and so over time, the gel coat will fall off to reveal the ‘bubble’ underneath. Fill it, sand it and forget it. It shouldn't be too important.
To date I've been lucky – on this project I have encountered nothing worse than blisters and scratches. So far so good!
Finally, for those who like information presented in a simple,concise way with plenty of illustrations - here is an excellent book I have come across.
Sailboat Refinishing (International Marine Sailboat Library) (USA)
Sailboat Refinishing (International Marine Sailboat Library) (UK)


Seaward


Monday, 9 September 2013

Bringing Back Gel Coat on a GRP Boat


One problem with this semi self-sufficient lifestyle we have adopted is that the exchange of time for money is not an equal equation. The only way to spend less money is to do jobs yourself and those jobs can take four times longer than a professional would calculate. There is no real saving in materials if you want to do a reasonable job. In terms of renovating this boat therefore, it seems as if I have been working on this project forever and yet there is little to show for it so far. So little in fact that the average guy walking past my boat would suspect that no work had been done at all. One reason for this is that I decided to tackle the worst, most worn scratched and degraded parts of the boat first – the cockpit. This is where badly directed ropes had worn groves in the gel coat, where countless sandy soled shoes had scratched their way across the decking, and where water, both salt and fresh, had laid in puddles or soaked into the edges of ply locker lids. The boat is on a trailer however, so the average boat yard stroller would see nothing of the work I had done in there.

Time to move things on. Time to do something that will cause people to realise I mean business. This boat is a Westerly Nomad, a very distinctive design. The cabin is stretched right to the sides of the hull, there are no side decks, Westerly lovers say she is a ‘whaleback’ design; less generous critics refer to her as a ‘Banana’. Either way, those cabin sides above her hull are really noticeable. If they’re clean and bright they make the boat look cared for. If they are dirty and scratched she looks like a derelict. So, maybe here is a job that I can do with some speed which might produce results much more striking that the effort would suggest.

We have family staying with us at the moment – been like that most of the summer, so it would be impolite to disappear to the boat each morning returning home just for lunch or evening meal. So, I have been visiting the boat for one or two hours at a time, when guests are happy and catered for. I keep the Honda generator in the boat cabin, so that I don’t need to use the car to visit the boatyard every trip but it is a heavy old beast and getting it out of the cabin onto the ground for use takes time. It’s also quite a job to get her back into the cabin after use, so for short working episodes it’s impractical.

Instead I have been relying on a Black & Decker cordless drill. Generally I don’t like Black and Decker tools – too many have burnt out on me. But this particular specimen seems to be an exceptional piece of kit. I got her for nothing, thanks to the loyalty points system operated by our local Supermarket (Super U). In effect, the more wine I purchase there, the more points I get – points mean presents and so I am now the owner of this item.

So, the cordless screwdriver charges overnight and that gives me one hour of cabin side sanding each morning. It then recharges during the afternoon and I get another sanding session in the twilight period while others are settling down to nibbles and appero’ drinks.

Well, three days (six hours) of sanding with a 50 grade disc attached to the Black and Decker have had a remarkable effect. All the big surfaces on the starboard side of the boat have transformed from grey, yellow, scratched and gritty gel coat, to pristine white. There is still a lot to do, small areas around windows, port lights and cleats, angles where the cabin sides meet the hull around the rubbing strake – but my! She’s starting to look good. Next job, will be to go over the area again with a less abrasive paper – probably 125, then again with a 200 or 250 followed by rubbing compound and then polish. I’m pleased with the results so far though, and the effort (for once) has been minimal.

Seaward

Monday, 26 August 2013

Boat Renovation and Intermediate Technology


So, the cockpit interior is painted and the combings are polished. I’m pleased with the results and surprised by the amount of time the job took. I could have done better though. What would I have done differently? Well International Paints produce three shades of white. One is very pure – a hint of blue in it I think. The white I chose was called Mediterranean White    - it is a softer colour – but there is another called Ivory – slightly creamier and I think it would have blended better with the original gelcoat which I’m hoping not to have to paint. Hindsight is a great thing but there is still a great deal to do so it is important I push on while the weather is still reasonably good.

There has to be time for reflection and planning however, and so that is my excuse for not doing too much this coming week. In truth I have been invited to crew a boat delivery trip (Toinoux, a Moody 33) from my home port Plouer Sur Rance to St Valerie en Caux in Normandy – quite a complicated voyage of about 180 sea miles. I don’t know how we’ll do it yet but almost certainly we will head north for Guernsey and then West along the English Channel trying to stay out of the busy shipping lanes and also to avoid the inshore fishing fleets and the cargo traffic entering and leaving Le Havre, Cherbourg, Caen, and the Seine estuary. The first part of the trip may be the most challenging as we have the highest tides (and strongest tidal streams) in northern Europe right outside our front door – all the way up to Guernsey. There is a kind of shortcut through the Alderney race but the timing has to be right otherwise you bounce around a good deal even on a calm day.

I’m hoping the trip will be fun and that it will provide time for me to move my thinking along about the boat restoration and reflecting on what I have learned so far. One important lesson is that simple sailing and low cost cruising cannot be achieved by the use of inferior materials or fittings. If it isn’t marine grade don’t use it. The real saving is in labour charges – do everything you can yourself even if it takes four times as long as a professional (and it probably will!).

Something I have discovered to my advantage however is that these older 1960 GRP boats were built in remarkably traditional ways. I’m reminded of the world’s first iron bridge built and still standing in the UK midlands. Iron at that time was the new wonder material but its properties were not fully understood or exploited – as a result the bridge was heavily constructed using standard woodworking joints. So it seems to be with this old Westerly Nomad, there are few significant internal mouldings, everything can be unscrewed broken down and taken home for working on in a more sheltered environment. It wouldn’t be too difficult to reconfigure the accommodation if I could think of a better, more convenient, arrangement. 

One thing I am sure of since looking at The Unlikely Boat Builder Blog is that I don’t like all these dark heavily varnished Teak bulkheads. I’m tempted to paint them all in a flat white matt and edge them with a paler varnished wood like John has done. Take a look at his site I think you’ll agree that’s the way to go.


Seaward

Tuesday, 12 February 2013

Boat Maintenance in France


 Bear with me. This Blog is about renovating a boat – but there is a context, the boat and its owner are English, the location is France – and that makes some things different – not better or worse – just different.


In my last post I reported that my boat was built to UK specifications (Imperial measurements) good old feet and inches, whereas my tools seem to be all metric. As a result I had to resort to some drastic measures to remove some items from her. It felt more like vandalism that restoration. Well, now here are a few other differences I have encountered this week.

Firstly, I have discovered the ‘price’ of living in a truly beautiful rural area – distances are vast and fuel bills are high. Popping down to my nearest chandler is a thirty mile round trip. It’s a beautiful trip but a long way to go for a stainless steel jubilee clip. Careful planning and thinking ahead doesn’t pay dividends but it keeps costs down. It’s even harder to find Marine ply in the sizes I require. My first port of call was Bois Marine at St Malo – they had the stuff alright but only as full size metric equivalents of standard 8’x4’ sheets. For smaller amounts I was advised to contact individual boat builders to see if they have suitable off-cuts from other jobs. These tend to be sole traders or family businesses and their premises are only open when they are around. A builder who gains a few days work down at the marina may not bother to open his yard for several days on end.

Well that’s OK; I have time, so a day spent touring boatyards in the hope that one or two will be open is no great hardship for me – in fact I enjoy it, except for the two and a half hour’s ‘dead’ period between noon and two thirty when there is no point visiting anywhere at all because the entire region (many supermarkets included) is ‘at lunch’.  It’s a different approach to life, and its one of the things that attracted me here so I’m not complaining but on occasion I have been left kicking my heals in some pretty distant and obscure places waiting for the end of a long lunch break only to be told that the item I’m seeking is not available.

When it comes to hard wood, I have admitted defeat. The original wood on this boat was Iroko (called African Teak by the builder) but this area of France is full of Oak. Excellent mature Oak is available everywhere – Teak, Iroko and Mahogany are considered to be rare and exotic. As a result these species are difficult to locate and extremely expensive so any new wood brought aboard will be have to be Oak.

The strangest thing however, was my encounter with bilge-paint. I have decided that all the bilges should be cleaned and re-painted. This decision is not based on an obsessive desire for neatness or cleanliness, rather a practical view that clean bilges are a good indicator of a boat’s health. If, for example, I launch with pristine bilges and subsequently discover rust stains or watermarks, I can assume I have a problem in that location. If however, I launch with dirty oil and water stained bilges I might not know I have a problem until seawater laps around by ears.

Now, to my simple eye, Red Danboline (International Paints) is the best. I have used it before, it brings bilges back to ‘as-new’ condition, and oil, rust or water make obvious stains on it.  International Paints produce Danboline in Red and Gray (possibly white also). For some reason however, the red isn’t available in France. Now this isn’t simply an oversight on the part of International Paints, it is a decision that someone has taken. Red Damboline is actually marked as ‘unavailable in France’ in their publicity. Fortunately I visited the UK recently and came back with some from there. So is there something about the Red Damboline that the French authorities know about? Something sinister? Toxic? Dangerous? If so, I wish they’d tell me.


Seaward

Sunday, 3 February 2013

Boating Confessions – sometimes it feel like…


Am I renovating this boat or destroying her? Well, today I have to confess to two acts of destruction and one unholy thought – giving away my Roman Catholic upbringing here – but I have an excuse which I’ll come to in a moment, firstly the acts of destruction.

Act One.

Along both edges of the cockpit well there were solid wood beams which acted as runners for two marine ply sliding doors which offered access to lockers under the seats. The marine ply doors were ugly, delaminated and, in one case, swollen so that opening and closing was very difficult. The runners were held in place by bolts through the GRP seat moulding and they were not pretty, one had been shortened at some point and one had several soft spots. Economy should have suggested careful removal of the runners and maybe replacement of the doors. The bolts however were rusted and didn’t want to budge. I managed to remove a couple but, well there is always at least one which doesn’t want to play – in my case there were several. I coated them in penetrating oil last week but it had no effect. I was also hampered by the fact that my tools are metric whereas the boat was built to good old fashioned feet and inches – so tools, spanners and the like, are always either a trifle too big or small. When they are too big it’s very easy to round off the angle of the nut and then the job becomes impossible. One option was to try to saw through the bolt but the heads were sunk into the wood and dowelled over and from the other side (inside the locker) they were unreachable. Well, the wood wasn’t in very good condition so it was relatively easy to cut it away in sections – and then the bolts were easy to remove with a pair of blot croppers – job done, but nothing is recoverable, the wood is good only for the stove – so I now have to fashion some new ones out of hardwood and make up two new locker doors. Mmmm not sure my woodworking is up to it.

Act Two

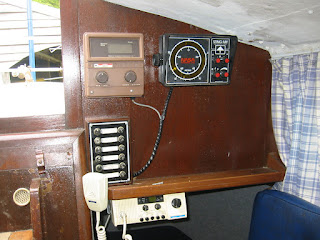
Two marine ply bulkheads either side of the companion way hatch are as ugly as sin itself. They’re covered in an almost black varnish with an assortment of holes drilled through at various times to accommodate electrical wires and screws to attach instruments. The wiring is frightening tangle; some of the threads seem to go nowhere. To call it a cobweb would be an insult to the whole arachnid species. I was pretty sure I’d have to re-wire the boat but now it’s certain, I cut through hundreds of wires in an attempt to get the bulkheads out.

Confession

Varnish lovers, forgive me for what I am about to do. I spent a good deal of time sanding the face of these bulkheads with a view to varnishing but having got back to the original wood, well its just plain ugly. I don’t like it – the colour is non-descript, neither a rich mahogany nor a pale beach, the overriding colour is grey with a black grain in places. I don’t know what it is but a clear varnish will not be the solution and I don’t like woodstain. So my solution will be to paint the wooden bulkheads and edge them with varnished hardwood strips. I’m thinking too of running some vertical strips of hardwood down the bulkheads at 4 inch intervals before painting to give the impression of planking rather than ply. We’ll see – and I’d appreciate your thoughts. 

In the meantime I’m trying to console myself  with Belgian beer and by remembering that if you wish to make an omelette you have to start by breaking a few eggs.


Seaward

Sunday, 20 January 2013

Westerly Nomad


Checkout new Quiz and get the answers to December questions on Seaward's Quiz Page

New mouthwatering cruising recipe on Susan's Page 

For the past week, whenever I have had the chance, I’ve been sanding the wooden bits of the boat that are detachable and it’s a pretty boring occupation I must say. It’s an opportune time however, because regular readers will know that I am also heavily involved in renovating an old fisherman’s cottage on the Rance Estuary near St Malo in France. Now that work has got to the point where underfloor heating has been installed and the ground floor is being tiled. So, there is a lot of dust from the tile cutting and my contribution of sanding dust hardly makes any difference to the general chaos. It means I can work inside with warm feet thanks to the new under-floor heating, and the mess I make gets swept up occasionally along with the builder’s dust and rubble.

It also means that I can plug in music to alleviate the boredom – thank goodness for BB King, Buddy Guy, Muddy Waters, Howlin’ Wolf, Lightning Hopkins, Mississippi John Hurt, The Doors, Janice Joplin, Chris Rea and a whole host of others!

I mentioned the purchase of a Bosch detail sander which cost me about E50, because I burned out two others in as many months working on the floorboards of the house – to date it hasn’t let me down – maybe this is a real example of getting what you pay for. I certainly won’t be buying Black and Decker again.

In an earlier post I mentioned that despite her GRP hull and topsides, much of the boat seems to have been traditionally built – fittings are screwed-on rather than moulded-in and this has proved very helpful because I can take gear and furniture off to replace or restore. Now in doing this, I came across a number handwritten in pencil on the underside of one of the companion way steps. Westerly Nomads were not built in huge numbers and the production run was only about two years so I wonder what the number could tell me – were the steps made specifically for this boat? If so, does the number indicate an early or late model? Maybe someone out there can solve the mystery – Oh the number, by the way, WN 8653. Presumably WN stands for Westerly Nomad. It’s silly really, but I couldn’t bring myself to sand it away, so one small part of the boat will be left practically untouched in memory of the builder who scribbled that part number on the wood back in 1967, 1968 or 1969.

Now – here is a brief article from Brian Turner (brian.turner752@gmail.com) He has a blog himself and is very concerned about DIYers who come into contact with old asbestos. I undertook a boat surveying course myself before embarking on this project and great emphasis was placed there on the dangers of asbestos in old boats – especially as lagging for engine pipes and compartments – his short article below therefore is especially welcome. You can find Brian’s profile on Google blogger.

Take Precautions When Renovating Your Home in 2013

Home renovations are growing in popularity this winter season. People are replacing their windows, replacing their rooftops and replacing insulation in the walls. Any of these tasks can expose renovators to asbestos. This is a dangerous and deadly mineral that can be deadly if inhaled. Once the mineral lodges into the tissue lining of the lungs or other organs, it can develop into
mesothelioma, which is a cancer that lies dormant for a period of 10 to 50 years. Here are some ways that you can avoid being exposed to asbestos.

1.  Do Not Disturb Asbestos If Discovered
Asbestos should not be drilled, sawed, broken, or hammered through to prevent inhalation. If floor tiles are made of asbestos, the tiles should not be sanded or buffed. The buffing process should include low abrasion pads, and the buffer speeds should be below 300 rpm.

2. Solicit the Help of Professionals
Professionals should be hired to check the home for asbestos and remove it if necessary. Professionals have the appropriate equipment to prevent being exposed to asbestos. The service may be costly, but it is worth the effort and cost if no one is exposed to asbestos. Make the investment to prevent an untimely death due to exposure.

3. Wear Protective Gear
If you must remove the asbestos yourself, wear protective gear. Protective gear may include an aspirator, goggles, gloves, hat or hairnet and a full body suit. This will protect the renovators from asbestos exposure. Protective gear is of utmost importance during renovations and should not be an option but a requirement.

4. Remove All Clothing and Shower Before Coming in Contact With Your Family
You should remove all your clothing and shower to remove any asbestos before leaving the home site during renovations. You should avoid hugging your family or friends before changing clothes and showering also.  If you are diligent about this process, you will lower the risk of asbestos exposure.

Consider These Tips Before Performing Home Renovations
Home renovations are important, but you do not have to sacrifice your health for home renovations. Always wear protective clothing and take precautions to avoid exposing family and friends to asbestos. Consider these tips and take precautions before performing home renovations.

Thanks Brian

Seaward